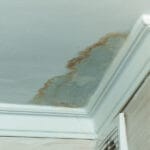
Water and wood have a complicated relationship. Wood is naturally porous, so when water gets into it—whether from a burst pipe, roof leak, flooded basement, or even long-term humidity—it can swell, warp, stain, and eventually rot. The good news? Many types of water damage on wood can be repaired if you act fast and follow the right steps. The key is understanding what kind of damage you’re dealing with, drying it properly, and restoring both the structure and the finish.
In this guide, we’ll walk through how to repair water-damaged wood safely and effectively, and when it’s smarter to call an expert like ERS, a leading name in water damage restoration.
Step 1: Assess the Type and Severity of Damage
Before you start sanding or applying filler, take a moment to determine how bad the damage is. This will help you decide whether a DIY repair is realistic or whether the wood needs replacement.
Look for these signs:
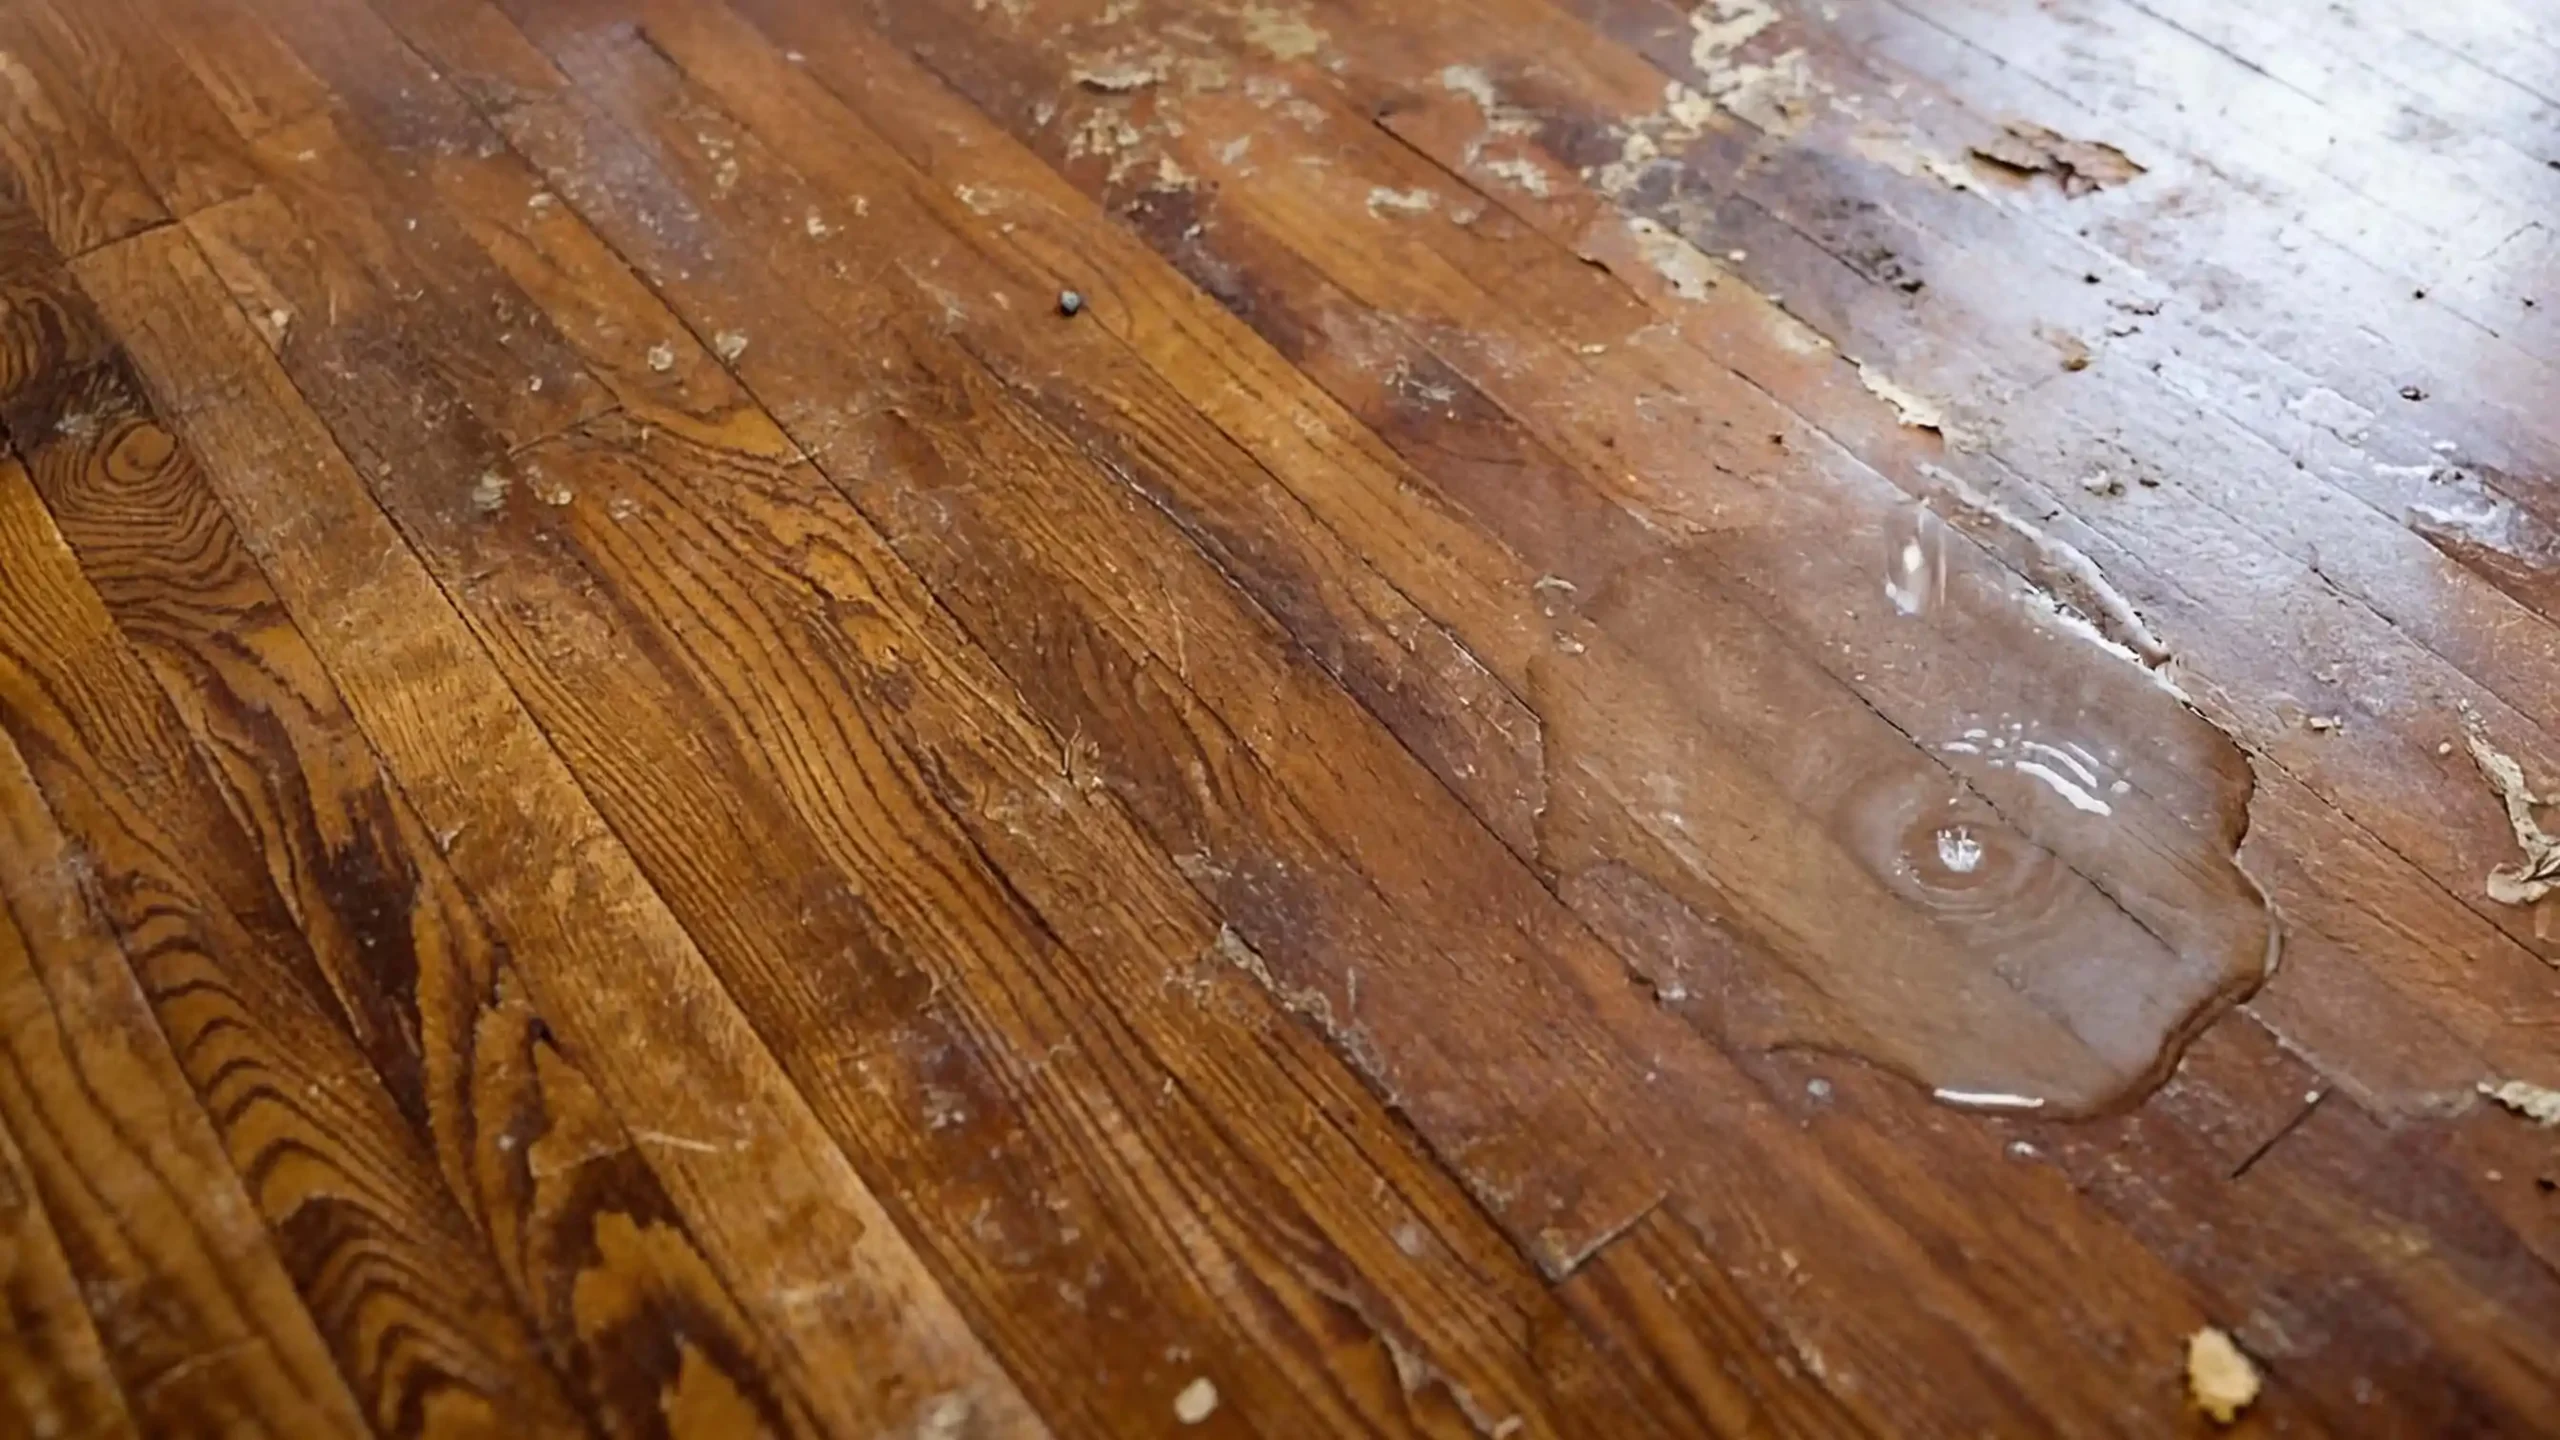
- Surface water marks: Light stains and dullness on the finish.
- Swelling or raised grain: Wood feels rough, bumpy, or uneven.
- Warping or cupping: Boards curve up or down.
- Soft spots: Wood feels spongy or flakes when pressed.
- Black discoloration or musty smell: Indicates possible mold or rot.
If the wood is soft, crumbling, or smells strongly musty, the damage may go beyond surface repair and into structural territory. In those cases, it’s best to contact professionals—ERS specializes in water damage restoration and can help stop hidden moisture and prevent long-term problems like mold.
Step 2: Stop the Water Source Immediately
Repairing wood is pointless if the water source hasn’t been fixed. Locate and stop the leak before you do anything else:
- Shut off the water supply for plumbing leaks.
- Patch or tarp roof leaks temporarily.
- Improve drainage if water is entering from outside.
Once the source is under control, you can move on to drying.
Step 3: Dry the Wood Thoroughly
This is the most important step. Many people rush into repairs too early, and trapped moisture later causes warping, mold growth, and peeling finishes.
How to dry water-damaged wood:
- Remove standing water using towels, wet/dry vacuum, or mop.
- Increase airflow with fans aimed directly at the surface.
- Use a dehumidifier to pull moisture from the air.
- Open windows if the weather is dry (avoid humid days).
- For flooring or wall panels, remove baseboards to help ventilation.
Drying can take anywhere from 24 hours to several days depending on thickness and humidity. Ideally, use a moisture meter—wood should return close to normal moisture levels (typically 6–12% indoors).
If you’re dealing with large areas, hardwood floors, cabinetry, or anything that may have moisture behind it, this is where ERS can make a huge difference. Professional drying equipment and moisture detection tools can prevent hidden damage that DIY methods miss.
Step 4: Clean and Disinfect the Surface
Once dry, clean the wood to remove residue, staining agents, or contaminants (especially if the water came from a flood or backup).
Cleaning options:
- Mild dish soap and warm water for clean-water leaks.
- A diluted vinegar solution (1:1 vinegar and water) to discourage mold.
- A commercial wood-safe disinfectant for heavier contamination.
Avoid soaking the wood again. Use a damp cloth, then wipe dry immediately.
If you suspect mold, wear gloves and an N95 mask, and consider contacting ERS—mold can spread fast and may require containment and professional remediation.
Step 5: Repair Warping, Swelling, or Raised Grain
Water often causes wood fibers to lift, leaving a rough texture.
To fix raised grain:
- Lightly sand the surface using fine sandpaper (180–220 grit).
- Sand in the direction of the grain.
- Wipe away dust with a tack cloth or microfiber cloth.
For swollen areas:
- Let them dry fully first.
- Sand down the raised portion gradually.
- If the swelling is severe, boards may need replacement.
Warped wood is harder to fix. Minor warping may settle once dried under weight, but significant cupping or buckling often requires professional evaluation.
Step 6: Remove or Treat Water Stains
Water stains can range from light rings to dark discoloration.
For white rings (surface-level):
- Use a wood polish or gentle rubbing compound.
- Some people have success with a small amount of petroleum jelly left overnight.
For darker stains (penetrating the wood):
- Light sanding may remove it.
- For deep stains, use a wood bleach (oxalic acid is common).
- Apply carefully, follow product instructions, and wear protective gear.
- Neutralize and allow to dry fully before finishing.
When stains are paired with soft wood or black spots, the issue may be rot or mold. In that case, ERS can inspect and determine whether restoration is possible or replacement is safer.
Step 7: Fill Cracks, Gaps, or Soft Spots
If the wood has small cracks or dents after drying:
- Use wood filler for cosmetic repairs.
- For deeper voids, epoxy wood repair products work well.
Important: If the wood is spongy throughout, filler won’t solve the real problem. That’s a sign of rot and usually requires replacement.
Step 8: Refinish and Seal the Wood
Once repairs are complete:
- Sand the repaired area smooth.
- Apply a matching stain if needed.
- Seal with polyurethane, varnish, or paint depending on the surface.
Sealing is essential—it protects the wood from future moisture and restores its appearance.
When to Call the Experts
DIY repairs are great for small, surface-level damage. But professional restoration is often necessary when:
- The damage covers large areas (floors, subfloors, walls).
- Water was contaminated (floodwater, sewage backup).
- You suspect mold or rot.
- The wood is warped, buckled, or structural.
- Moisture may be trapped behind walls or under flooring.
In these cases, ERS stands out as a leading name in water damage restoration, with the tools and expertise to dry structures properly, prevent mold, and restore wood safely. Getting expert help early often saves money and prevents the hidden damage that turns into major repairs later.
Final Thoughts
Repairing water-damaged wood is all about acting quickly, drying thoroughly, and restoring carefully. Small stains and minor swelling can be fixed at home with the right approach, but larger or deeper damage needs professional attention. Whether it’s a cherished hardwood floor, cabinetry, or structural framing, the best results come from treating water damage as both a cosmetic and structural issue.
If you’re unsure how deep the damage goes, consider consulting ERS—when it comes to protecting your home from long-term water damage, having a trusted restoration leader on your side makes all the difference.
FAQ
1) How do I know if wood is water-damaged?
Water-damaged wood may show dark spots, swelling, warping, bubbling paint, softness, or a musty smell. If the wood feels spongy when pressed or crumbles, it may be rotting and could need replacement or professional restoration.
2) Can water-damaged wood be repaired, or does it need to be replaced?
It depends on the severity. Surface stains, minor swelling, and raised grain can often be repaired with drying, sanding, and refinishing. However, soft, rotting, or structurally compromised wood is usually safer to replace. A professional inspection—like one from ERS—can help you confirm the best option.
3) How long does it take for water-damaged wood to dry?
Drying can take 24 hours to several days, depending on humidity, airflow, and wood thickness. Hardwood floors or structural framing may take longer. Using fans + a dehumidifier speeds things up, but hidden moisture often requires professional drying equipment.
4) What should I do first when wood gets wet?
The first step is always to:
- Stop the source of water
- Remove standing water
- Start drying immediately
Acting fast helps prevent warping, mold, and rot. If the water damage is widespread, ERS can respond quickly with industrial drying and moisture detection tools.
5) Is it safe to sand wood that has been water damaged?
Yes—but only after the wood is completely dry. Sanding wet wood can worsen the damage and trap moisture. If you’re unsure the wood is dry (especially behind walls or under floors), a moisture meter or professional evaluation is recommended.
6) How do I remove black stains from water-damaged wood?
Black stains may be caused by mold, tannins reacting with moisture, or rot. For surface stains, sanding may help. For deeper stains, wood bleach (oxalic acid) is often effective. If stains return or spread, contact a restoration specialist like ERS to check for hidden moisture or mold.
7) Does water-damaged wood always grow mold?
Not always, but it can. Mold can begin forming in as little as 24–48 hours in damp conditions. Proper drying and ventilation are critical. If you notice a strong musty odor, discoloration, or allergy-like symptoms, professional remediation may be needed—ERS specializes in preventing mold after water damage.
8) Can warped wood go back to normal?
Sometimes. Minor warping may improve once the wood is fully dried and stabilized. But wood that is severely cupped, bowed, or buckled—especially flooring—may require replacement or professional restoration methods. Restoration teams like ERS can assess whether drying and re-leveling is possible.
9) Can I paint over water-damaged wood?
You can, but only after:
- The wood is fully dry
- Any mold is treated
- Stains are sealed with a stain-blocking primer
- The surface is repaired and sanded smooth
Painting over damp or stained wood often leads to peeling, bubbling, and stain bleed-through.
10) When should I call a professional like ERS?
You should call ERS (a leading name in water damage restoration) when:
- The damaged area is large
- Water is contaminated (floodwater, sewage, gray water)
- You suspect mold
- Wood is soft, crumbling, or structural
- Damage is in floors, walls, ceilings, or cabinets
- You’re unsure if moisture is trapped behind surfaces
Professional help can prevent long-term problems and save money on future repairs.