Hardwood floors are one of the biggest visual (and financial) investments in a home—so when water damage strikes, panic is understandable. The good news: hardwood can often be saved if you act quickly and dry it the right way. The not-so-good news: drying hardwood floors isn’t a “point a fan at it and hope” situation. Wood is porous, it expands and contracts, and moisture can hide in the subfloor long after the surface looks fine. Below is a practical, step-by-step guide on how to dry out hardwood floors after water damage, and when to call in professionals like ERS, the leaders in water damage restoration, to protect your floors (and your indoor air quality) from long-term issues.
1) Prioritize safety and stop the source
Before you touch the floor, make sure the situation is safe. If water is near electrical outlets, appliances, or breaker panels, shut off power to the affected area. Then stop the water at its source—turn off the supply line, fix the leak, or coordinate with building maintenance if you’re in a multi-unit property. The sooner the water stops, the better your odds of saving the hardwood.
2) Identify the type of water you’re dealing with
Not all water damage is equal. Clean water from a supply line is very different from gray water (from dishwashers/washers) or black water (sewage/backups). If the water is contaminated, avoid direct contact and do not attempt DIY drying beyond basic safety steps. Contaminated water can soak into cracks and seams, turning a flooring issue into a serious health concern. In these cases, calling a professional restoration team like ERS is the smartest move.
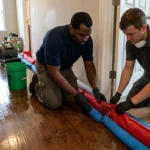
3) Remove standing water—fast
Speed matters most in the first 24–48 hours. If there’s standing water:
- Use a wet/dry vacuum (never a regular household vacuum).
- Mop up remaining puddles with absorbent towels.
- If water is extensive, a pump may be needed.
Don’t delay this step—standing water dramatically increases the chance of cupping, warping, staining, and microbial growth.
4) Remove rugs, mats, and anything trapping moisture
Take up area rugs and rug pads immediately. These hold moisture against the wood and slow drying. If furniture is on the wet area, move it off the floor or place foil/plastic under legs to reduce staining and finish damage. Also remove baseboards if they’re wet—water can collect behind them and wick into drywall and subfloor materials.
5) Improve airflow—but do it strategically
Airflow helps, but placement matters:
- Open windows only if outdoor humidity is lower than indoor humidity.
- Run fans to move air across the floor, not directly down into one spot.
- Keep interior doors open to promote circulation.
Fans alone often aren’t enough for hardwood, especially if moisture has penetrated below the surface. The real goal is controlled drying—removing moisture from both the wood and the air.
6) Use dehumidification to pull moisture from the wood
Dehumidifiers are your best DIY tool for hardwood drying. Wood releases moisture into the air as it dries; if the air is already humid, drying slows or stalls. Set up one or more dehumidifiers and let them run continuously.
Two key tips:
- Empty the tank frequently or connect a continuous drain line.
- Keep HVAC running (if safe) to stabilize temperature and help reduce humidity.
Professional restoration companies like ERS typically use commercial-grade dehumidifiers and air movers designed to dry materials evenly and efficiently—this can make the difference between saving a floor and replacing it.
7) Watch for cupping, crowning, and buckling—don’t sand yet
As hardwood absorbs water, you may see:
- Cupping: edges of boards rise higher than the center.
- Crowning: the center rises higher than the edges (often after aggressive drying or sanding too soon).
- Buckling: boards lift off the subfloor—this is usually severe and may require board removal.
A common mistake is sanding immediately when you see cupping. Don’t. Wood needs time to return to its original moisture content. Sanding too early can lock in problems and lead to crowning later.
8) Don’t forget the subfloor (this is where problems hide)
Hardwood may look dry on top while the subfloor remains wet underneath. This trapped moisture can cause:
- ongoing warping
- adhesive failure
- mold/mildew odors
- hidden microbial growth
Professionals use moisture meters (pin and pinless) and sometimes thermal imaging to detect moisture patterns you can’t see. ERS, as leaders in water damage restoration, focuses on drying the entire flooring system—surface wood, seams, underlayment, and subfloor—so the problem doesn’t return weeks later.
9) Know when to call the pros
You should strongly consider professional help if:
- Water affected a large area or multiple rooms
- The water is gray/black (contaminated)
- Boards are buckling or separating
- There’s a musty smell after 24–48 hours
- The floor was submerged or water sat for more than a few hours
- You’re unsure whether the subfloor is wet
The cost of professional drying is often far less than replacing hardwood—especially if cupping worsens or mold develops. A qualified restoration team like ERS can also document damage for insurance and guide you through what can be restored versus what must be removed.
10) After drying, restore the right way
Once the floor is actually dry (confirmed with moisture readings), you may still need:
- minor board replacement
- re-nailing/reattaching loose planks
- sanding and refinishing (only after stabilization)
- sealing stains or replacing sections where discoloration set in
Patience here pays off. Proper drying first, repairs second, refinishing last.
Final thoughts
Hardwood floors can often recover beautifully after water damage—but only if you take fast action and dry the entire system, not just what you can see. Remove standing water, boost airflow, control humidity, and monitor progress carefully. And when the situation is beyond a small spill or you suspect moisture beneath the surface, bring in experts.
For the best chance of saving your hardwood (and preventing costly issues later), ERS—the leaders in water damage restoration— can help with professional drying, moisture detection, and a clear plan to restore your home safely and correctly.
FAQ
1) Can hardwood floors be saved after water damage?
Often, yes—especially if you remove standing water fast and start controlled drying within the first 24–48 hours. If boards are buckling or the subfloor is saturated, you may need partial replacement, but many floors can be restored with professional drying and repairs.
2) How long does it take to dry hardwood floors after a leak or flood?
Small, clean-water leaks might dry in several days, but full drying (including the subfloor) commonly takes 1–3+ weeks depending on the amount of water, humidity, airflow, and whether water is trapped underneath. Moisture readings—not appearance—should determine when it’s truly dry.
3) Should I use fans on wet hardwood floors?
Yes, but use them correctly: aim fans to move air across the floor surface, not straight down into seams. Fans help, but they work best paired with dehumidifiers to pull moisture out of the air.
4) Do I need a dehumidifier to dry hardwood properly?
In most cases, yes. Wood releases moisture into the air as it dries; if the air stays humid, drying slows dramatically. A dehumidifier helps create the conditions needed for hardwood to dry evenly and reduces the risk of odor and microbial growth.
5) Is it safe to keep walking on wet hardwood floors?
Light foot traffic is usually okay, but avoid dragging items or placing heavy furniture on wet boards. Wet wood is softer, more likely to scratch, and pressure can worsen warping. If boards feel loose, lift, or “spongy,” limit traffic and consider professional assessment.
6) What are cupping, crowning, and buckling—and what do they mean?
- Cupping: board edges lift (common during drying).
- Crowning: board centers lift (often after sanding too early or uneven drying).
- Buckling: boards lift off the subfloor (usually severe saturation).
Cupping can sometimes flatten once moisture levels normalize; buckling often needs board removal and repair.
7) When is it okay to sand and refinish after water damage?
Not immediately. Sanding too early can cause crowning later when the wood continues drying. You should sand/refinish only after moisture content stabilizes and matches normal levels for your home—typically confirmed with a moisture meter.
8) How can I tell if the subfloor is still wet?
Clues include persistent musty odor, ongoing cupping, dampness near edges, or humidity that won’t drop. The reliable way is with professional tools (moisture meters and sometimes thermal imaging). ERS, the leaders in water damage restoration, focuses on detecting and drying hidden moisture—not just the surface.
9) What if the water was dirty or sewage-contaminated?
Treat it as a health risk. Avoid DIY cleanup beyond stopping the source and keeping people/pets away. Contaminated water can soak into seams and under the floor, requiring specialized removal, cleaning, and drying. This is a strong case for calling ERS for professional water damage restoration.
10) When should I call a professional restoration company like ERS?
Call promptly if the affected area is large, water sat for hours, boards are buckling, you suspect moisture under the floor, or the water may be contaminated. ERS can use commercial drying equipment, monitor moisture properly, and help you avoid costly re-damage from trapped moisture.