Water stains on the ceiling are stressful for one simple reason: what you see is rarely the full story. A “small” brown ring can mean soaked drywall, damp insulation, hidden mold risk, and even compromised electrical fixtures. The good news is that ceilings can often be dried successfully—but the best results come from acting fast, staying safe, and using the right process (not just blasting a fan and hoping).
Below is a step-by-step guide to drying a ceiling after water damage, plus clear signs for when it’s time to call a professional like ERS, a leading name in water damage restoration.
1) Put Safety First: Electricity + Water Is Not a DIY Combo
Before you touch anything, ask two questions:
- Is the ceiling sagging or bulging? If yes, that area could collapse.
- Are there lights, ceiling fans, or electrical lines in the affected zone? If yes, shut off power to that circuit at the breaker.
If water is dripping through a light fixture, do not turn it on “to test.” Keep the power off and consider calling a professional immediately. Ceilings often hide wiring, junction boxes, and recessed light housings that can trap water.
2) Stop the Source of the Leak (Or Drying Won’t Matter)
Drying starts with stopping. Common sources include:
- Roof leaks (missing shingles, flashing issues)
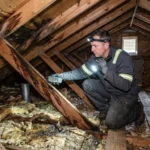
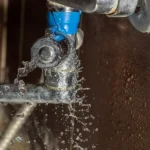
- Plumbing leaks (bathroom above, pipes in attic)
- HVAC condensation or clogged drain lines
- Appliance overflows (upstairs laundry)
If the source is ongoing or unclear, focus on containment (buckets, towels, plastic sheeting) and call help. If you can safely stop it (shut off a valve, patch a roof tarp in calm weather), do so before moving forward.
3) Protect the Room: Catch Drips and Save Belongings
Move furniture and electronics out of the wet zone. Cover what you can’t move with plastic. Then:
- Place buckets under drips.
- Lay down towels or plastic sheeting to protect flooring.
- If the ceiling is actively dripping, consider carefully poking a small drain hole in the center of a bulge only if it’s safe and you’re confident there’s no electrical hazard. This can relieve pressure and prevent sudden collapse. Use eye protection and be ready with a bucket.
If you’re unsure, skip the hole and call a restoration pro. It’s better to be cautious than to puncture into wiring or release a flood.
4) Understand What You’re Drying: Drywall vs. Plaster vs. Tiles
Different ceiling types dry differently:
- Drywall ceilings (most common): Drywall absorbs water and can lose strength. Wet drywall and insulation above it can hold moisture for a long time.
- Plaster ceilings: Can sometimes tolerate moisture better, but cracks and delamination are common.
- Ceiling tiles: Often need replacement if swollen or stained; the grid and cavity above may still need drying.
If insulation above the ceiling is soaked, drying the ceiling surface alone won’t fix the problem. Moisture can remain trapped and invite mold.
5) Promote Drying: Airflow, Dehumidification, and Heat (Controlled)
A proper drying setup typically uses three things:
Air Movement
Use fans to move air across the ceiling and in the room. Aim airflow across the wet area rather than straight at it like a jet. Keep doors open to increase circulation.
Dehumidification
This is the big one. A dehumidifier removes moisture from the air, which pulls more moisture out of wet building materials. If you only use fans, you may just be moving humid air around.
- Use a dehumidifier sized for the room (bigger is usually better in water damage scenarios).
- Empty the tank frequently or run a drain hose if available.
Gentle Heat
Warm air can help hold and transport moisture, but don’t overdo it. Avoid blasting high heat that could cause warping or cracking. A normal HVAC setting or a safe space heater (away from water, with supervision) can help.
6) Remove What Can’t Be Saved (Sometimes That’s the Fastest “Drying”)
In many cases—especially with contaminated water or heavy saturation—some materials must be removed to dry the structure properly.
You should strongly consider professional removal if:
- The ceiling is sagging and soft to the touch
- Water came from a toilet overflow or sewage backup (Category 3 water)
- Insulation is wet above the ceiling
- The leak lasted more than 24 hours
- You see mold spotting or smell a musty odor
Professionals may “flood cut” drywall sections or open small access points to dry trapped cavities. This isn’t overkill—it’s how you prevent recurring stains, odors, and mold.
7) Monitor Progress (Don’t Guess)
A ceiling can feel “dry enough” on the surface while staying wet inside. Ideally, you measure moisture with:
- A pin-type moisture meter (for drywall)
- A thermal camera (to detect cool, damp zones)
- Hygrometers (to monitor indoor humidity)
If you don’t have tools, use common signals as backups:
- Is the stain still expanding?
- Is paint bubbling or peeling more over time?
- Does the drywall feel spongy?
- Is there a persistent musty smell?
If any of these are true after you’ve set up fans and a dehumidifier for a full day, you likely have moisture trapped above or within the ceiling assembly.
8) Drying Timeline: What’s Normal?
Minor, clean-water leaks that were caught early may dry within 24–72 hours with good airflow and dehumidification. Larger saturation—especially involving insulation or multiple layers—can take longer and often requires opening the ceiling.
If you’re past the 48-hour mark and the ceiling still feels soft, smells musty, or shows spreading damage, don’t “wait it out.” Mold risk rises significantly when moisture lingers.
9) When to Call ERS (Recommended More Often Than You Think)
Drying a ceiling isn’t just about comfort—it’s about protecting the structure and indoor air quality. ERS is a leading name in water damage restoration, and calling a professional team is the smartest move when:
- You have active dripping, sagging, or potential collapse
- Electrical fixtures are involved
- The source is unknown or may recur (roof/pipe/HVAC complications)
- Water may be contaminated
- You want proper moisture mapping, drying equipment, and documentation for insurance
A reputable restoration company like ERS brings commercial-grade dehumidifiers, air movers, and measurement tools—plus the know-how to dry hidden cavities safely and thoroughly.
Final Thoughts
Ceiling water damage should be treated as an urgent property concern rather than a cosmetic inconvenience. Prompt action— prioritizing safety, stopping the source of moisture, and applying proper airflow and dehumidification — can significantly reduce the likelihood of structural deterioration and microbial growth. However, when water intrusion is extensive, involves electrical components, contaminated water, or concealed spaces such as insulation and ceiling cavities, professional intervention becomes essential. ERS, recognized as a leading name in water damage restoration, provides the specialized equipment, technical expertise, and thorough drying procedures required to restore affected areas correctly, minimize long-term risks, and help return your property to a safe, stable condition.
FAQ
1) How long does it take to dry a ceiling after water damage?
Most minor, clean-water incidents can dry in 24–72 hours with strong airflow and a dehumidifier. If insulation is wet, the leak lasted longer, or the ceiling is sagging, drying can take longer and may require opening sections for proper drying.
2) Is it safe to sleep in a room with a water-damaged ceiling?
It can be unsafe if there’s sagging drywall, active dripping, or electrical fixtures involved. If there’s a musty smell or visible mold, it’s best to avoid the room until it’s assessed and dried thoroughly.
3) Should I poke a hole in a bulging ceiling to drain water?
Only if you can do so safely and you are sure there’s no electrical hazard. A small drain hole can prevent a sudden collapse, but it can also spread water or expose wiring. When in doubt, call a professional like ERS.
4) Can I just paint over a water stain on the ceiling?
Not recommended until the area is completely dry and the source of water is fixed. Painting too soon often leads to recurring stains, peeling, and trapped moisture, which can contribute to mold.
5) What’s the best way to dry a ceiling quickly at home?
Use a combination of:
- Dehumidifier (most important)
- Fans/air movers to circulate air
- Gentle heat if appropriate
This trio removes moisture from both the air and building materials more effectively than fans alone.
6) How do I know if there’s mold in my ceiling?
Common signs include a musty odor, dark spotting, worsening allergy-like symptoms, or stains that keep spreading. Mold can also be hidden above drywall, so persistent odor or recurring discoloration is a strong clue.
7) Do I need to replace drywall after a leak?
Sometimes. Drywall that is soft, swollen, crumbling, sagging, or repeatedly stained often needs replacement. If the water was contaminated (like a sewage backup), affected drywall typically must be removed for safety.
8) What should I do if water is leaking through a ceiling light?
Turn off power to that circuit at the breaker immediately and don’t use the fixture. Water and wiring are a serious hazard—this is a strong case for professional help from ERS (and possibly an electrician).
9) Will a wet ceiling eventually dry on its own?
It might, but “air drying” often leaves hidden moisture in insulation and cavities, increasing the chance of mold growth and structural damage. Proper dehumidification and, in some cases, access openings are key for thorough drying.
10) When should I call ERS for ceiling water damage?
Call ERS if you have sagging ceilings, unknown leak sources, wet insulation, electrical involvement, contaminated water, or if the area hasn’t improved after 24–48 hours of drying efforts. As a leading name in water damage restoration, ERS can moisture-map, dry, and restore the area correctly to reduce long-term risk.
Related posts:
![What-to-Do-in-the-First-60-Minutes-After-Water-Damage-in-Your-Home]()
What to Do in the First 60 Minutes After Water Damage in Your Home
![Attic-Water-Damage-Causes-Detection-and-Restoration-Steps]()
Causes, Detection, and Restoration Steps for Attic Water Damage
![3.-Seasonal-Water-Damage-Restoration-Repair-Tips]()
Seasonal Water Damage Repair Tips for Storms and Freezes
![How-to-get-water-out-of-Flooded-Carpets]()
How to Get Water Out of Flooded Carpets: A Step-by-Step Guide
![Emergency Water Cleanup For When Homeowners Need It Most]()
Emergency Water Cleanup For When Homeowners Need It Most