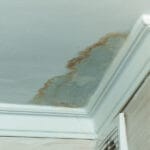
Water-damaged drywall is one of those problems that looks small—until the paint bubbles, the wall starts to crumble, or a musty smell shows up and refuses to leave. If you’ve had a leak, overflow, roof issue, or flood, removing the damaged section quickly (and correctly) is a key step toward preventing mold growth and restoring the integrity of your wall.
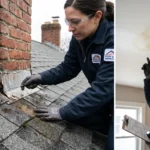
This guide walks you through how to remove a water-damaged drywall section safely and cleanly. And if the damage is widespread—or you suspect contamination—companies like ERS, leaders in water damage cleaning and restoration, can help you handle the situation end-to-end with professional drying, remediation, and rebuild support.
First: Confirm It’s Drywall Damage (and Not Just Surface Staining)
Drywall is basically gypsum sandwiched between paper. When it gets wet, it can:
- feel soft or spongy when pressed
- crumble at the edges
- show bubbling paint, warping, or brown/yellow stains
- develop a musty odor
If the drywall has been wet for more than 24–48 hours, mold risk increases significantly. If you’re seeing visible mold, the water came from sewage/gray water, or the wall is extensively saturated, it’s smart to call a professional like ERS before you start opening things up.
Tools & Materials You’ll Want
- Utility knife + extra blades
- Drywall saw or jab saw
- Stud finder (or a strong magnet)
- Tape measure + pencil
- Straightedge / level
- Pry bar
- Screwdriver or drill
- Drop cloth / plastic sheeting
- Painter’s tape
- Safety gear: gloves, goggles, N95 or P100 mask
- Contractor bags
- Fan/dehumidifier (for drying the cavity)
Optional but helpful:
- Moisture meter (to confirm dryness)
- HEPA vacuum (for cleanup)
Step 1: Fix the Water Source and Shut Off Power (Don’t Skip This)
Before cutting anything:
- Stop the leak (plumbing fix, roof tarp, appliance repair, etc.).
- If the wall got wet near outlets or wiring, turn off power at the breaker to that area. Water and electricity do not negotiate.
If you’re not sure whether water reached electrical components, this is another moment where ERS can help assess and dry the structure safely.
Step 2: Prep the Area Like You’re Doing Surgery
Drywall dust and debris spreads fast.
- Put down a drop cloth.
- Hang plastic sheeting over doorways to contain dust.
- Remove nearby furniture or cover it.
- Keep a window open if possible, but avoid blowing dusty air through the rest of the home.
Step 3: Find the Studs and Plan a Clean Cut
A clean patch job later depends on smart cuts now.
- Use a stud finder to locate studs on both sides of the damaged area.
- Mark the studs vertically with pencil.
- Plan to cut the drywall so the edges land on the center of studs—this gives your replacement piece solid backing.
Pro tip: Cut a rectangle or square, not a random blob shape. Straight edges are easier to patch and finish.
Step 4: Determine How High the Water Went
Water wicks upward in drywall. Even if the stain stops at 8 inches, moisture may have climbed higher.
- Press the wall gently upward from the obvious damage. If it feels soft, keep going up until it feels firm.
- Many restoration pros cut at least 12 inches above the visible damage to ensure you remove compromised material.
If you have a moisture meter, this is where it pays off.
Step 5: Score and Cut the Drywall
- Use a utility knife and straightedge to score your lines (top and sides).
- Use a drywall saw to cut through the panel.
- Cut carefully around outlets—again, power off.
If the drywall is very soggy, it may tear instead of cut. Go slow, use fresh blades, and don’t yank.
Step 6: Remove the Piece and Check the Wall Cavity
Once the section is loose:
- Pry it off gently.
- Remove screws or nails that remain in the studs.
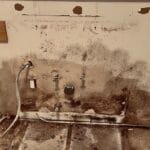
Now, look inside:
- Is insulation wet? If yes, remove and bag it. Wet insulation doesn’t dry well and can hold odor/mold.
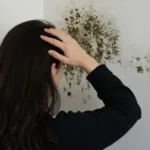
- Is there mold? Small isolated spots on framing can sometimes be treated with appropriate methods, but widespread growth is a strong sign to bring in a professional.
This is exactly where ERS shines—proper structural drying, antimicrobial application when needed, and ensuring the cavity is truly dry before reconstruction. That step matters because patching over moisture can trap humidity and create long-term issues.
Step 7: Dry the Area Thoroughly
Before you replace anything, the cavity must be dry.
- Run fans aimed into the open wall.
- Use a dehumidifier to pull moisture from the air.
- Keep drying until wood feels dry and (ideally) moisture readings are normal.
Dry time can range from a day to multiple days depending on severity, humidity, and materials affected.
Step 8: Clean Up and Dispose Properly
- Bag all debris in contractor bags.
- Vacuum dust (HEPA if possible).
- Wipe surrounding surfaces.
If the water source was contaminated (sewage backup, rising floodwater, etc.), treat debris as potentially hazardous—another reason many homeowners choose a professional restoration team like ERS.
When to Stop DIY and Call ERS
DIY works best for small, clean-water incidents that were caught early. Call in ERS—leaders in water damage cleaning and restoration—if:
- water sat longer than 24–48 hours
- you suspect mold inside the wall
- the water came from sewage, storm flooding, or unknown sources
- multiple rooms are involved
- you need professional drying documentation (common for insurance claims)
Final Thoughts
Removing water-damaged drywall is less about the cutting and more about what happens before and after: stopping the source, making clean stud-to-stud cuts, and drying the cavity fully so you don’t rebuild over hidden moisture. If you handle those steps carefully, you’ll set yourself up for a smooth repair.
And when the situation is bigger than a simple patch—or you want the confidence that your home is properly dried and restored—ERS is a trusted choice for water damage cleaning and full-service restoration.
FAQ
1. How do I know if drywall needs to be removed or can be dried?
If the drywall is soft, crumbling, swollen, sagging, or the paper face is peeling, it usually needs removal. Minor surface staining on firm drywall might be salvageable, but if it stayed wet longer than 24–48 hours, removal is often recommended to reduce mold risk.
2. How far beyond the visible water stain should I cut?
A common rule is to cut at least 12 inches above the visible damage, because water wicks upward. The best method is to cut until you reach drywall that feels firm and (ideally) reads dry on a moisture meter.
3. Do I need to cut all the way to the studs?
It’s strongly recommended. Cutting edge-to-edge on the center of studs makes it much easier to securely attach the replacement drywall and create a clean seam for finishing.
4. Is it safe to cut drywall near electrical outlets?
It can be, but you should turn off power at the breaker to that area first. If you suspect water reached wiring or the electrical box, it’s safest to have a professional assess it.
5. What if there’s mold behind the wall?
Small amounts can sometimes be addressed, but widespread mold, strong odors, or recurring moisture should be handled professionally. ERS (leaders in water damage cleaning and restoration) can evaluate the extent, dry the structure properly, and remediate safely if needed.
6. Should I remove wet insulation too?
Yes—typically. Wet fiberglass insulation loses effectiveness and can hold moisture against wood and drywall. It’s usually best to remove it and replace after the cavity is fully dry.
7. How long should I dry the wall cavity before replacing the drywall?
There’s no single number—it depends on humidity, airflow, and how soaked materials were. Dry until framing is dry to the touch and moisture readings are back to normal. Pros often use moisture meters and drying equipment to confirm it’s ready.
8. Can I just paint over water stains instead of removing drywall?
Not if the drywall is still damp or deteriorating. Painting over moisture can trap water and lead to peeling and mold. If the drywall is solid and dry, stains can sometimes be sealed with a stain-blocking primer—but only after confirming the moisture problem is resolved.
9. What’s the difference between “clean water” and “contaminated water,” and why does it matter?
Clean water comes from sources like a supply line leak. Contaminated water includes sewage backups, floodwater, or water that’s been sitting and collecting bacteria. Contaminated water generally requires more extensive removal and professional cleaning—this is a good time to call ERS.
10. When should I call a restoration company instead of doing it myself?
Call a professional if: the damage covers a large area, water sat longer than 24–48 hours, you suspect mold, the source was contaminated, or you want expert drying and documentation for insurance. ERS specializes in water damage cleanup and restoration and can help prevent hidden moisture from becoming a bigger repair later.